- Privacy Policy
- Prep-Ahead Meals Cookbooks
- Kid’s Activities
- Gluten-Free Recipes
- Budgeting Tips
Premeditated Leftovers™
Prep-Ahead Meals, Cooking Tips, and Frugal Living

Sound and Volume Vibrations Science Experiment
January 31, 2017 by Ann 1 Comment
This Sound and Volume Vibrations Science Experiment can be done while enjoying a variety of music! It’s fun and easy learning activity for kids of all ages.
Teaching children about sound and volume is a hard task. This simple Sound And Volume Vibrations Science Experiment for kids is a great homeschool lesson that will help you accomplish this task easily with all ages. Your kids will also be able to enjoy different types of music in the process!
Sound And Volume Vibrations Science Experiment
It’s hard to show movement for this experiment with photos, so in the first set up we just put the tissue balls on there randomly. The second time I did more of a pattern to see them move. As you do this science experiment with your kids, you’ll see first hand it is easier to visually understand than the pictures show.
- Radio or CD Player with music
- Large glass bowl
- Plastic wrap
- Rubber Band
- Pieces of Tissue Paper
This is also a very loud experiment, so consider that when doing it with the kids. Use ear protection or think about their sensitivity to sound. I keep this set of ear protective ear muffs on hand for various science experiment ideas like this.
Directions:
1. Place a piece of plastic wrap on the top of a glass bowl and straighten as best as possible. Wrap a rubber band around the plastic wrap to hold it in place. Gently pull on the plastic wrap under the rubber band to make a very tight fit onto the bowl. 2. Crumble up a few small pieces of tissue paper and set them onto the plastic wrap.
3. Place the bowl next to a speaker and play music. Is the paper moving?
Turn up the volume: Now what happens? Try another type of music: What level of volume makes the tissue paper move?
4. Take it one step further! Line up tissue paper balls and guess which will fall off first.
Sound vibrates air. The sound from the speakers makes the air vibrate which makes the plastic wrap on the bowl vibrate. This makes the light pieces of tissue paper bounce around.
Learning Objectives:
How does sounds travel through air? Which songs/music genres make the most vibrations?
This science experiment is a great way to help kids of all ages understand sound and volume vibrations. Have fun experimenting with different noises and music to see how the tissue paper bounces. Your kids will love having fun with this experiment!
More Science Experiment for Kids:
Magnet Science Activity For Kids
Easy Water Science Experiments For Kids
7 Ways To Use Apples To Teach Science
How To Make Your Own Quicksand
Ice Cube Discovery Activity For Kids
Disappearing Egg Activity For Kids
Bouncing Beans Activity For Kids
Thanks to Kari of Craft Create Cook for sharing her project and pictures.
March 4, 2021 at 9:40 pm
Thank you for this idea. I am excited to try it with my 5.5 yr old!!
Leave a Reply Cancel reply
Your email address will not be published. Required fields are marked *
- Recipe Index
- Members Area

Welcome. I'm Alea!
7 Cool Sound Science Experiments for Kids
Nov. 19, 2018
When it comes to science experiments, some of the most enjoyable involve the science of sound. If you’re looking to dazzle your little learner with exciting new experiments, look no further than simple sound science experiments that use everyday household items to bring sound to life. Let’s explore 7 riveting ideas to discover the science behind sound! Watch educational videos with scientific experiments and show them to your child.
The Classic Paper Cup and String Phone
A much-loved childhood project, the paper cup phone is much more than a fun and old-fashioned way for kids to communicate throughout the house. This elementary sound science project shows kids how sound waves can travel through a string and be converted back to audible sound at the opposite end.
Supplies Needed:
- 2 paper cups
- Long string, like fishing line, kite string
- A sharp pencil or needle to poke holes in the cups
What to Do:
1. Start by cutting a long piece of string of at least 50 feet.
2. Poke a small hole at the bottom of each cup.
3. Using each end of the string, thread it through the bottoms of the cups, tying a large knot so that the string does not fall out of the cup. If you make the holes too large, use a washer or paper clip to hold the string in place so that it does not pull out of the cup.
4. Move into position and encourage your child to move away from you so that the string is far enough to make it tight. Be sure that the string does not touch any other object and that it remains suspended in air as you complete the experiment.
5. Taking turns, talk into the cup, while the other person listens by putting the cup to their ear. Tell your child to repeat what he or she hears after you have spoken and do the same in return!
After the experiment, explain to your child what is happening: sound waves created by talking through the cup travel through the line to the other end, converting back to sound on the opposite side!
Make Music with a Straw Pan Flute
Perfect for younger children, the following sound waves experiment not only involves creating a fun musical instrument your child could play with, but teaches kids how length can affect the pitch of sound waves.
Supplies Needed:
- At least 9 or 10 straws, more if desired!
- Clear gift wrap tape
1. Take the straws and line them up side-by-side and cut them at an angle at the top.
2. Tape the straws together to make a pan flute.
3. Instruct your child to blow through the straws. Which straws make higher and lower pitches? Why?
Feel free to use more straws and experiment with different lengths to produce different pitches and sounds! Ask your child to explain what happens to the sound the shorter a straw is cut, and create double pan flutes to make harmonies to further explore how length alters the pitch.
Listen to Sounds Travel Underwater
Sound travels well through air, but it travels even better through water! This easy sound experiment for kids can be done in a jiffy out on the back porch.
- A bucket filled with water
- A large plastic water or soda bottle
- At least 2 kitchen knives
- Scissors or sharp knife to cut the bottle
1. After filling the bucket with water, take a sharp knife or kitchen shears and help your child cut off the bottom of the plastic water bottle. Be sure that the cap is taken off of the bottle.
2. Instruct your child to place the bottle in the water so that the cut bottom is in the water. Your child will then put his or her ear to the top of the bottle to listen.
3. Using the kitchen knives, clang them together to make a sound, but do this in the bucket as your child is listening. What does your child hear?
Your child has probably noted that the sound of the clanging is loud and clear. Water travels faster through water than in the air, and animals that live underwater are able to hear sound clearly. Discuss the results with your child, to teach him or her more about the conduction of sound waves through water.
See the Sound
Sound vibrations travel through air, water, and even solid objects, but it’s not possible to see the waves. What if we could see the waves in another way? This science of sound experiment makes sound more visible by forcing objects to react to the sound vibrations.
- Empty clear mixing bowl
- Plastic wrap
- Large rubber band
- Sugar crystals- Sugar in the Raw works great, or make sugar crystals in another science experiment!
1. Wrap a sheet of plastic wrap over the mixing bowl so that it’s taut, and secure with the large rubber band. Be sure that the plastic wrap is tight and does not sag.
2. Place a few of the sugar crystals on the top of the plastic wrap, placing them in the middle of the wrap.
3. Instruct your child to get close to the sugar crystal and say something loudly! What happens to the crystals? Do they move?
4. Experiment with louder and softer words or sentences to watch the sugar crystals react to the sound vibrations!
While your child might think it’s his or her breath making the crystals jump and move, but it’s actually the sound vibrations. Try different sounds besides ordinary speech and see how the crystals come to life!
Make a Stick Harmonica
Making musical instruments are easy and fun, and they teach kids about sound waves and pitch. This experiment is much like the pan flute above, but kids can alter the pitch by sliding the straws without reassembling the harmonica.
- 2 large craft sticks
- 1 wide rubber band
- 2 smaller rubber bands
- 1 plastic drinking straw
1. Using the scissors, cut the straw into 2 one-inch pieces and set aside.
2. Take the wide rubber band and stretch it length-wise around one of the jumbo craft sticks and place one of the straw pieces under the rubber band, close to the edge on one end.
3. Take the other craft stick and place it directly on top of the craft stick with the rubber band. Secure them together at the ends using the small rubber bands.
4. Finally, take the last piece of straw and place it in the harmonica between the sticks on the opposite end from the other, but this piece should be fit above the wide rubber band instead of below it.
5. Encourage your child to play the harmonica by blowing in the center of the harmonica! Explore different pitches by moving the straw pieces!
After playing the harmonica, don’t forget to complete the sound experiment by talking about the mechanics of the harmonica. The vibrating rubber band makes all the noise, and the closer the straw pieces are to the center of the harmonica, the higher the pitch will be due to the shortened length of the band!
Experimenting with Sound Waves
It might be hard to imagine that sound waves can travel through solid objects as well as through the air. This simple but exciting sound waves science activity will demonstrate for your child how sound can and does indeed travel through solid objects!
- Metal kitchen spoon- a large metal measuring spoon works great!
- At least 30 inches of kite string
1. Stretch out the string and tie the handle of the spoon in the middle of the string.
2. Take one end of the string and tie around your child’s pointer finger. Do the same using the other end, but tie this string around the pointer finger of your child’s opposite hand.
3. Instruct your child to put his or her fingers, with the string wrapped around each, into their ears.
4. Help your child lean over so the spoon dangles and help him or her swing the spoon so it hits a nearby door or wall.
5. Hit the door or wall again, but this time with more force. What does your child hear?
Your child should hear a bell-like sound travel up the string from the spoon and into their ears. Discuss with your child how the sound waves created from the spoon hitting the door moves through the string until he or she is able to hear it!
Xylophone Water Jars
Musical instruments are so much fun to make! This sound activity teaches children how varying levels of water in containers change the pitch of the sound created.
- 4 empty and clean baby food jars
- 4 different colors of food coloring
1. Help your child fill each jar with varying amounts of water.
2. Add a few drops of food coloring to each jar.
3. Using the mallet, instruct your child to firmly tap the outside of each jar. What sounds are being made? Which jars have the highest or lowest pitch?
Encourage your child to hypothesize why some jars emit a lower sound, while others are higher. Play around with the water levels in each jar and experiment with pitch!
Learn Science with Kids Academy Classroom!
Use this interactive Classroom by Kids Academy called Sound is All Around Us to teach first graders the basics of sound science. OPEN THE CLASSROOM .
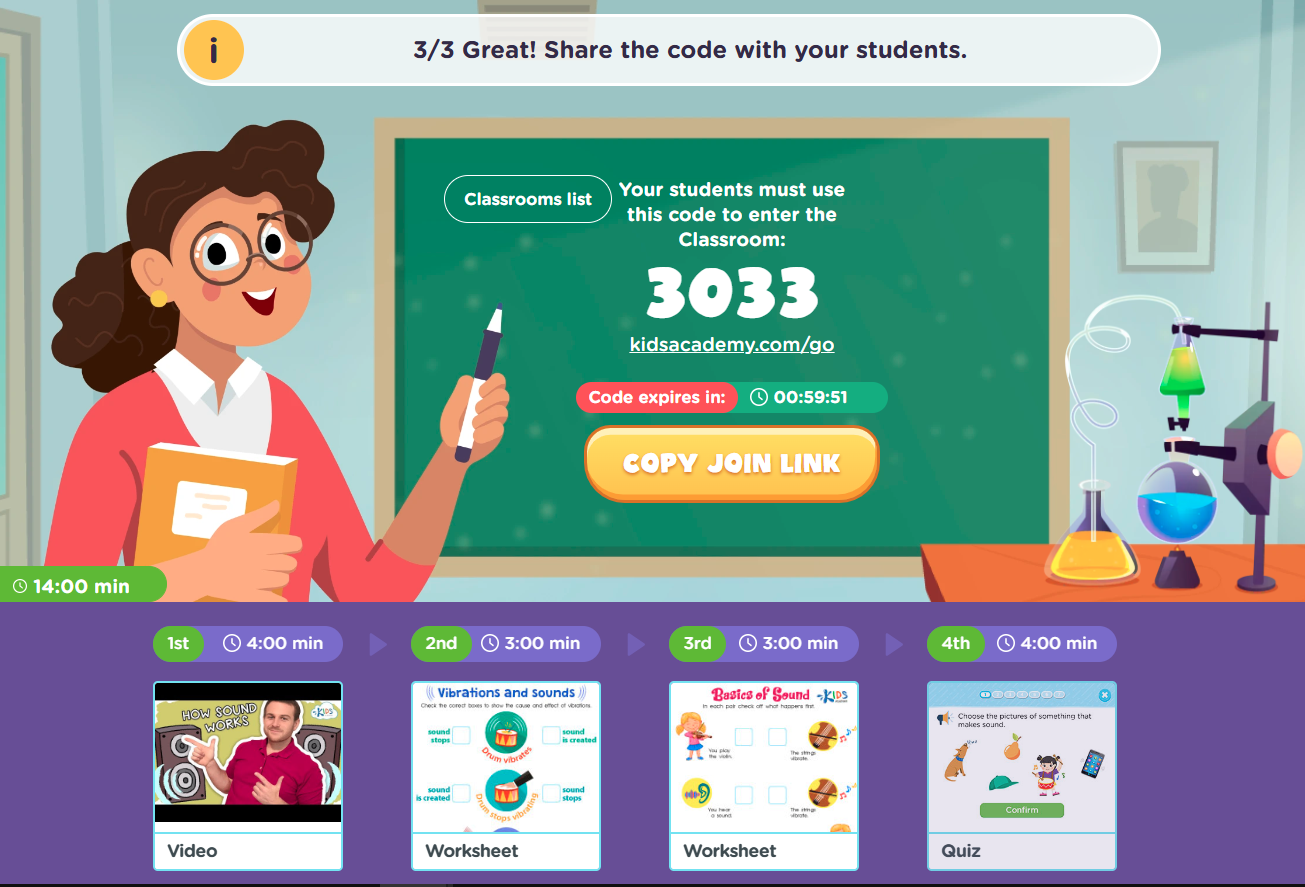
After clicking "Next", you'll find a set-up lesson with an educational video, accompanied by practice worksheets and summary quiz to help kids better understand and remember the learned material.
Equipped with our extensive learning resource library, Kids Academy Classroom allows teachers and parents to create lessons and share them with the young smarties in a couple of clicks.
Go directly to the Classroom page and create a quick classroom on any topic you want! After students complete the lesson, you'll get access to a report about their performance. Check out our Classroom Guide article for more information!
Now that you have 7 cool ideas for exciting sound science experiments, it’s time to get started! Your child will love learning all about the science of sound and the endlessly fascinating ways sound waves can travel through air, water, and objects. Don’t forget to check out our science worksheets and activities to supplement your child’s learning in between all your child’s experiments!
Related Articles
Cancel anytime
You'll be able to manage the favorite spreadsheets list.
You’ll be able to hide/mark the accomplished tasks.
- School / District Account
- Family Account
- 2 PDF worksheets per day
- Interactive worksheets
- Targeted ads
- KidsAcademy ads
$ 1.99 / month
- Printable and interactive worksheets
- Learning videos
- Ad-free browsing

- Engage students and save time with ready-to-use premium educational activities.
- Unlimited Learning Library access
$9.99 / month


Sound Experiment for Kids to See Sound
I love science! There are so many hands-on science experiments you can do with kids! Right now we are learning all about sound in our classroom. I have personally found that having a sound experiment for kids to demonstrate what they are learning is the best way for children to really understand the material.
So, I came up with a few sound experiments for kids, including my favourite tuning fork sound experiment and vibrating rice.
Keep reading for a few simple, hands-on ways to making learning about sound fun and meaningful.
The experiments work well in the classroom or at home.
Introducing big, but important concepts, such as sound and hearing, to young children may seem early; however, I am always amazed by how much children of all ages learn from hands-on science experiments.
When children are interested in a topic, they absorb and understand a lot of the material.
Slinky Sound Experiments
Kids are naturally drawn to do experiments and play and explore with their hands. I like to do this sound experiment with kids as a way to introduce big science concepts to young minds.
I have done this experiment with kids aged 3-10 and it is a hit with all of them. All you need is a slinky. A large one works best, but any size will work.
Sound Experiments Steps
I started by using a large slinky and having one child and I hold the ends on opposite sides of the carpet. I banged the slinky to send a wave to the other side. We talked about how sound travels in waves.
A big, fast wave equals a loud sound – like someone yelling. A small, slow sound wave may be someone humming. I either hummed or yelled as I banged the slinky to replicate how the volume and sound travels.
Sound Waves
Sound Experiment
The main idea you want to make clear is that sound travels in waves. Also, it is important that children know that sound waves are invisible.
The slinky is just a fun way to show what we can’t otherwise see.
Some students even noticed the slinky bounce back after reaching the student holding the other end of the slinky. This was a great chance to discuss echoes and how sound bounces.
Fork a Sound Experiments
This is perhaps my favorite sound experiment for kids! I love the excitement that it causes and the ‘explosive’ result. Also, kids of all ages are able to get hands-on and do the experiment. You only need a few materials:
- Plastic Wrap
- Uncooked rice or Large Sparkles (I added some food coloring to mine, but the color is just for fun.)
- Tuning Forks
Since I did this experiment with several groups, I had several containers ready to go. I grouped Children into groups. The smaller the groups the better.
Cover each container tightly with plastic wrap. The wrap has to be tight or the experiment will not work.
To start, I introduced the children to tuning forks. Many had not used or seen one before. Some recognized the fork being used in their music class before.
I gently banged one of the forks onto the carpet and held it up. We could hear a bit of a sound coming from the fork.
I had a child beside me gently touch the fork. They were able to feel that it was vibrating, but as soon as they touched the tuning fork the vibrations stopped.
We talked about the fact that when it was vibrating, it was making a sound. When it stopped vibrating, the sound also stopped.
Children then each had a chance to gently try out the tuning forks. They loved the hands-on experience. (I would suggest making sure to tell children not to hit the tuning forks too hard. Just a bit of a bump will work. Also make sure they are not banging it on anything that could break.)
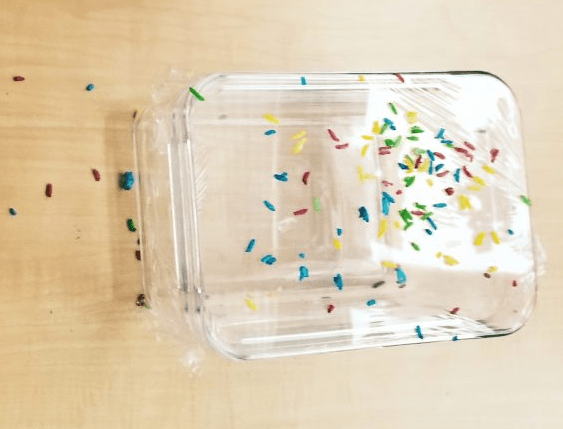
Next, children went to the tables with a small group. Each group got a container with the plastic wrap stretched across it. I then gave each group a small container of rice. You only need a small amount for each group.
Also, the more rice you give each group the more clean up there will be. The rice will go flying!!! (But that’s also the fun of the experiment.)
Children then pour the rice onto the plastic wrap. They make a guess what will happen once they touch the tuning fork to the plastic wrap.
Once they have guessed, they are ready to do the experiment.
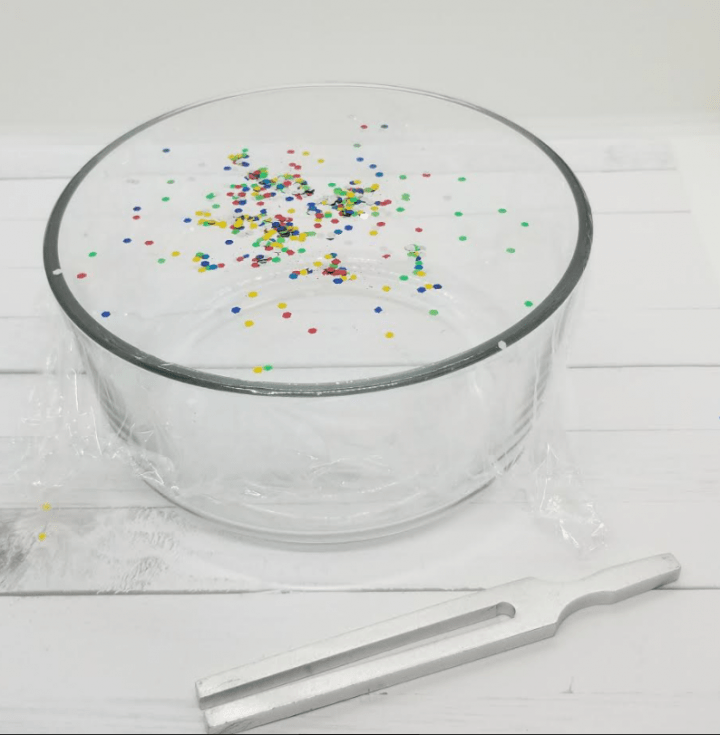
When banged, the tuning fork vibrates, which creates a sound. Tap the fork so that it is making a sound, and vibrating.
Next, touch the vibrating fork to the plastic wrap, but be sure not to touch the side of the bowl. You only need to touch it gently to get the result.
As soon as the vibrating fork touches the plastic wrap, it sends vibrations across the wrap and to where the rice is sitting. These vibrations cause the rice to “jump” until the vibrations/sound stops.
The tuning forks are ideal to have on hand when teaching or learning about sound.
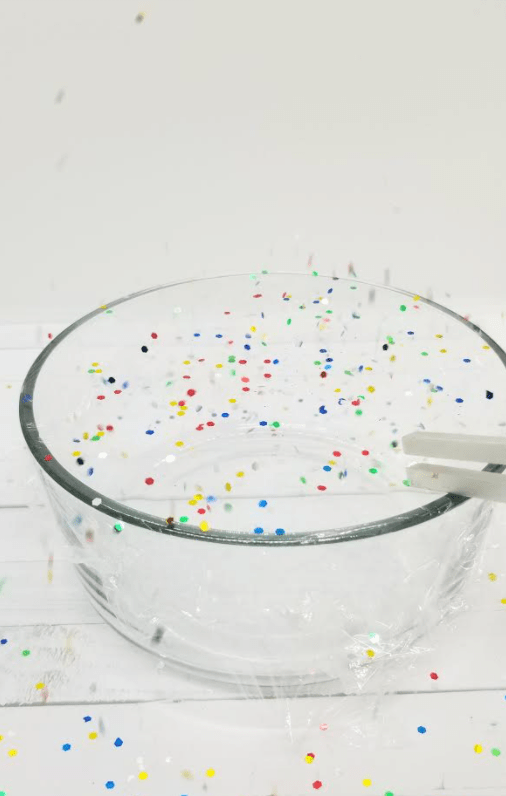
There was so much excitement in the room when the rice started bouncing everywhere! The mess is definitely worth the learning that occurred! Since the materials you need are so simple, you can repeat this tuning fork experiment several times.
I really wanted each child to be able to do the hands-on experiment. After each child got the rice to jump, the group worked together to gather the rice and put it back on the plastic wrap for the next child’s turn.
Repeat as many time as you wish!
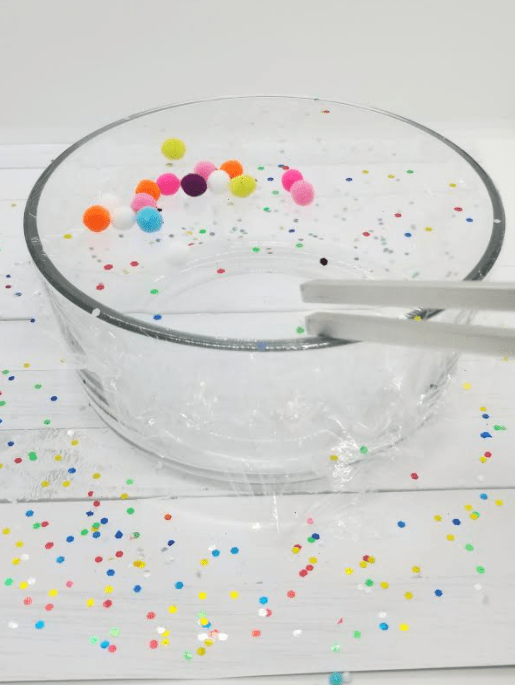
Sound Experiments Extension Activity
The tuning fork experiment sparked so much interest in my classroom that I wanted to extend our activity for another science lesson. If you have all of the materials for the fork a sound experiment, all you need extra to do another experiment is water!
As an extension, you can remove the plastic wrap and fill the glass bowls with water. I also added a few drops of food coloring just for fun.
Repeat the experiment above by banging the tuning fork and then touch it to the container with water. Make sure to only touch the water, and not the container.
When the fork is touched to the water it makes the water splash out of the bowl. This sound experiment is an easy way to show kids that sound causes vibrations/movement. Happy experimenting!
For your convenience, this post contains affiliate links. As an Amazon Associate I earn from qualifying purchases and I may earn a small commission at no cost to you.

Luna Bean Hand Casting Kit – Couples Gifts Idea, Anniversary for Couple Gift, Mothers Day Gifts, Gifts for Women Me…

4 Pack Christmas Wooden Puzzles for Kids Toddlers, Christmas Stocking Stuffers Party Favors Gifts, Xmas Wood Jigsaw…

Fenmay 72 Count Colored Pencils for Adult Coloring Books, Soft Core Drawing Sketching Blending Shading Pencils, Col…
Join hands-on teaching ideas.
Join Hands-On Teaching Ideas to gain access to my Free Resource Library filled with lots of printable learning resources, from a choice board full of STEM activities for kids to escape room games, you can download anything that interests you for your classroom or home.
Click “Subscribe Today” button below to subscribe and download the STEAM choice board right away.

More Hands-On Teaching Ideas
If you enjoyed the sound experiments above, you may like the activities below. From science to art and even escape rooms, I’ve got lots of learning activities to keep children busy.
Leave a Reply Cancel Reply
Your email address will not be published.
This website uses cookies in order to provide basic functionality. By continuing to use this website, you are consenting to their use. For more information, please read the relevant part of our privacy policy .
Primary Science Resources for the National Curriculum
Year 4 sound.
- Outstanding Science Year 4
Knowledge and Understanding
Statutory requirements, notes and guidance, lower ks2 - working scientifically, how we hear things worksheet free, outstanding science year 4 | sound | os4d001.
- Description
- National Curriculum
- Key learning
Learning objective
I can explain how sounds are made and how we hear things.
Children learn that sounds are caused by vibrations. They learn that sounds travel from an object, through a medium (usually the air), travel into the ear where they are carried down the ear canal and processed by the brain. Children complete an explanation text explaining how we hear things, by cutting and pasting or writing their own descriptions.
- 4d1 : identify how sounds are made, associating some of them with something vibrating
Sound insulation Investigation
Outstanding science year 4 | sound | os4d002.
I can investigate how well sound travels through different materials.
Children investigate how effective 5 different materials are at blocking sound. Recognising the difficulty of accurately measuring the loudness of a sound, they make each measurement 3 times and choose the median. Children use their results to create a bar chart and place the materials in order of effectiveness as sound insulators.
- 4d2 : recognise that vibrations from sounds travel through a medium to the ear

Investigating pitch Investigation
Outstanding science year 4 | sound | os4d003.
I can place different sounds in order of pitch.
Children learn about the difference between pitch and volume. They carry out an investigation where they place 5 different water containers in order, depending on the pitch made when air is gently blown across the top of each. They attempt to find a pattern and explain their results.
- 4d3 : find patterns between the pitch of a sound and features of the object that produced it
Making a string instrument Investigation
Outstanding science year 4 | sound | os4d004.
I can make a tuned string instrument.
Children explore how a string instrument makes a sound. Using an ice cream tub, elastic bands, and Lego blocks, they create their own string instrument. They explore how adding more Lego blocks affects the pitch of each string (band).
Pitch and volume Investigation
Outstanding science year 4 | sound | os4d005.
I can place sounds in order of pitch and volume.
Children learn that pitch and volume are two different properties of sounds. Children investigate the pitch and volume of the sound made when 5 different balls are dropped. Recognising the difficulty of measuring pitch and volume without equipment, children make 5 measurements and then choose the modal value. Children transfer their results to a scatter graph showing both pitch and volume.
- 4d4 : find patterns between the volume of a sound and the strength of the vibrations that produced it
Investigating volume Investigation
Outstanding science year 4 | sound | os4d006.
I can investigate how to affect the volume of a percussion instrument.
Children investigate how dropping a weight from different heights ont a drum affects the volume of the sound produced. Recognising the difficulty of measuring volume without equipment, children take each measurement 5 times and find the mean. Children create a line graph showing their results and attempt to explain the relationship between the height of the weight and the volume of the sound made.
Sound and distance Investigation
Outstanding science year 4 | sound | os4d007.
I can investigate how distance affects how well we can hear a sound.
Working on the yard or in the school hall, children investigate the maximum distance at which somebody can hear one of 5 body sounds (hand clap, sniff, cough, foot stamp and thigh slap). They place each sound in order of loudness and create a bar chart showing their results. They discuss the difficulty of getting accurate results without measuring equipment and ways of improving the investigation.
- 4d5 : recognise that sounds get fainter as the distance from the sound source increases.
Distance and volume Investigation
Outstanding science year 4 | sound | os4d008.
I can investigate the relationship between distance and volume.
Working on the school yard, children investigate the height a ball needs to be dropped from in order to be heard at different distances. Children predict and then measure the minimum height required, recording their results in a table. They create a line graph and explore the link between the distance and the miniumum height (and therefore volume) required.
Get instant access to all of our Year 4 resources.
Outstanding science - year 4 contains all of the following units:.
Unit 4A - Living Things And Their Habitats
Unit 4B - Animals, Including Humans
Unit 4C - States Of Matter
Unit 4D - Sound
Unit 4E - Electricity
Outstanding Science
Primary science resources.
Browse resources
128 Gordon Drive Dovecot Liverpool England L14 7PZ
0151 558 1485
Terms and conditions
Privacy policy

Outstanding Science © Copyright Minerva Education Ltd. 2015-2024. Responsive design built upon Bootstrap .
Andrea Knight
Teacher · Learner · Author
Sound Experiments

This science unit is so fun. It’s loaded with my favorite sound experiments, like this one. I first saw this idea in a library book and, to be honest, I didn’t expect it to be that big of a deal (or even work, if I’m still being honest). But to my surprise, it actually delivered. I think I suffer from Pinterest-Fail PTSD.
Singing Spoons is a fun way to show kids how volume and pitch change depending on whether sound waves are traveling through the air or through a solid, similar to the way a stethoscope works. It’s one of our favorite sound experiments and is pretty easy to set up. Just use tape to connect three metal spoons to a piece of string or yarn. Then, jiggle the string so the spoons swing into one another and observe the sound they make. It should sound dull and tinny. Next, wrap the ends of the string around your fingers as if you were going to floss your teeth. Place only the yarn-wrapped fingers in your ears (again, think of a stethoscope) and swing the spoons again. Notice how the pitch and volume change.
Even the adults in my house thought this was cool. And one of them is fairly hard to impress.😉

This experiment can easily be done without these sheets👇, but I like reading procedural and informational texts with my students and I also like having a place for them to record their own ideas during investigations.

More Sound Experiments
Hands down, the most satisfying part of planning this science unit was finally engineering a harmonica that actually works! I’m not exaggerating when I tell you how much we were geeking out over this one… maybe because it was our third attempt. But I guess that’s the nature of science experiments, right? In the one pictured below, changing the distance between the pink straws changes the pitch of the sound. Shorten the gap and the pitch will rise. Spread them back out and the sound will become lower. It’s all about vibrations and sound waves .
And the bee?🐝 If you swing it like a lasso above your head, it really does buzz! It’s another fun way to teach your students that vibrations cause sound.

I created student recording sheets for these sound experiments, as well as procedural posters (with picture support) and kid-friendly explanation sheets. These explanations help young children understand the science they’re observing, but I also like how they give families an age-appropriate context to build from when they want to talk to their kids about science.

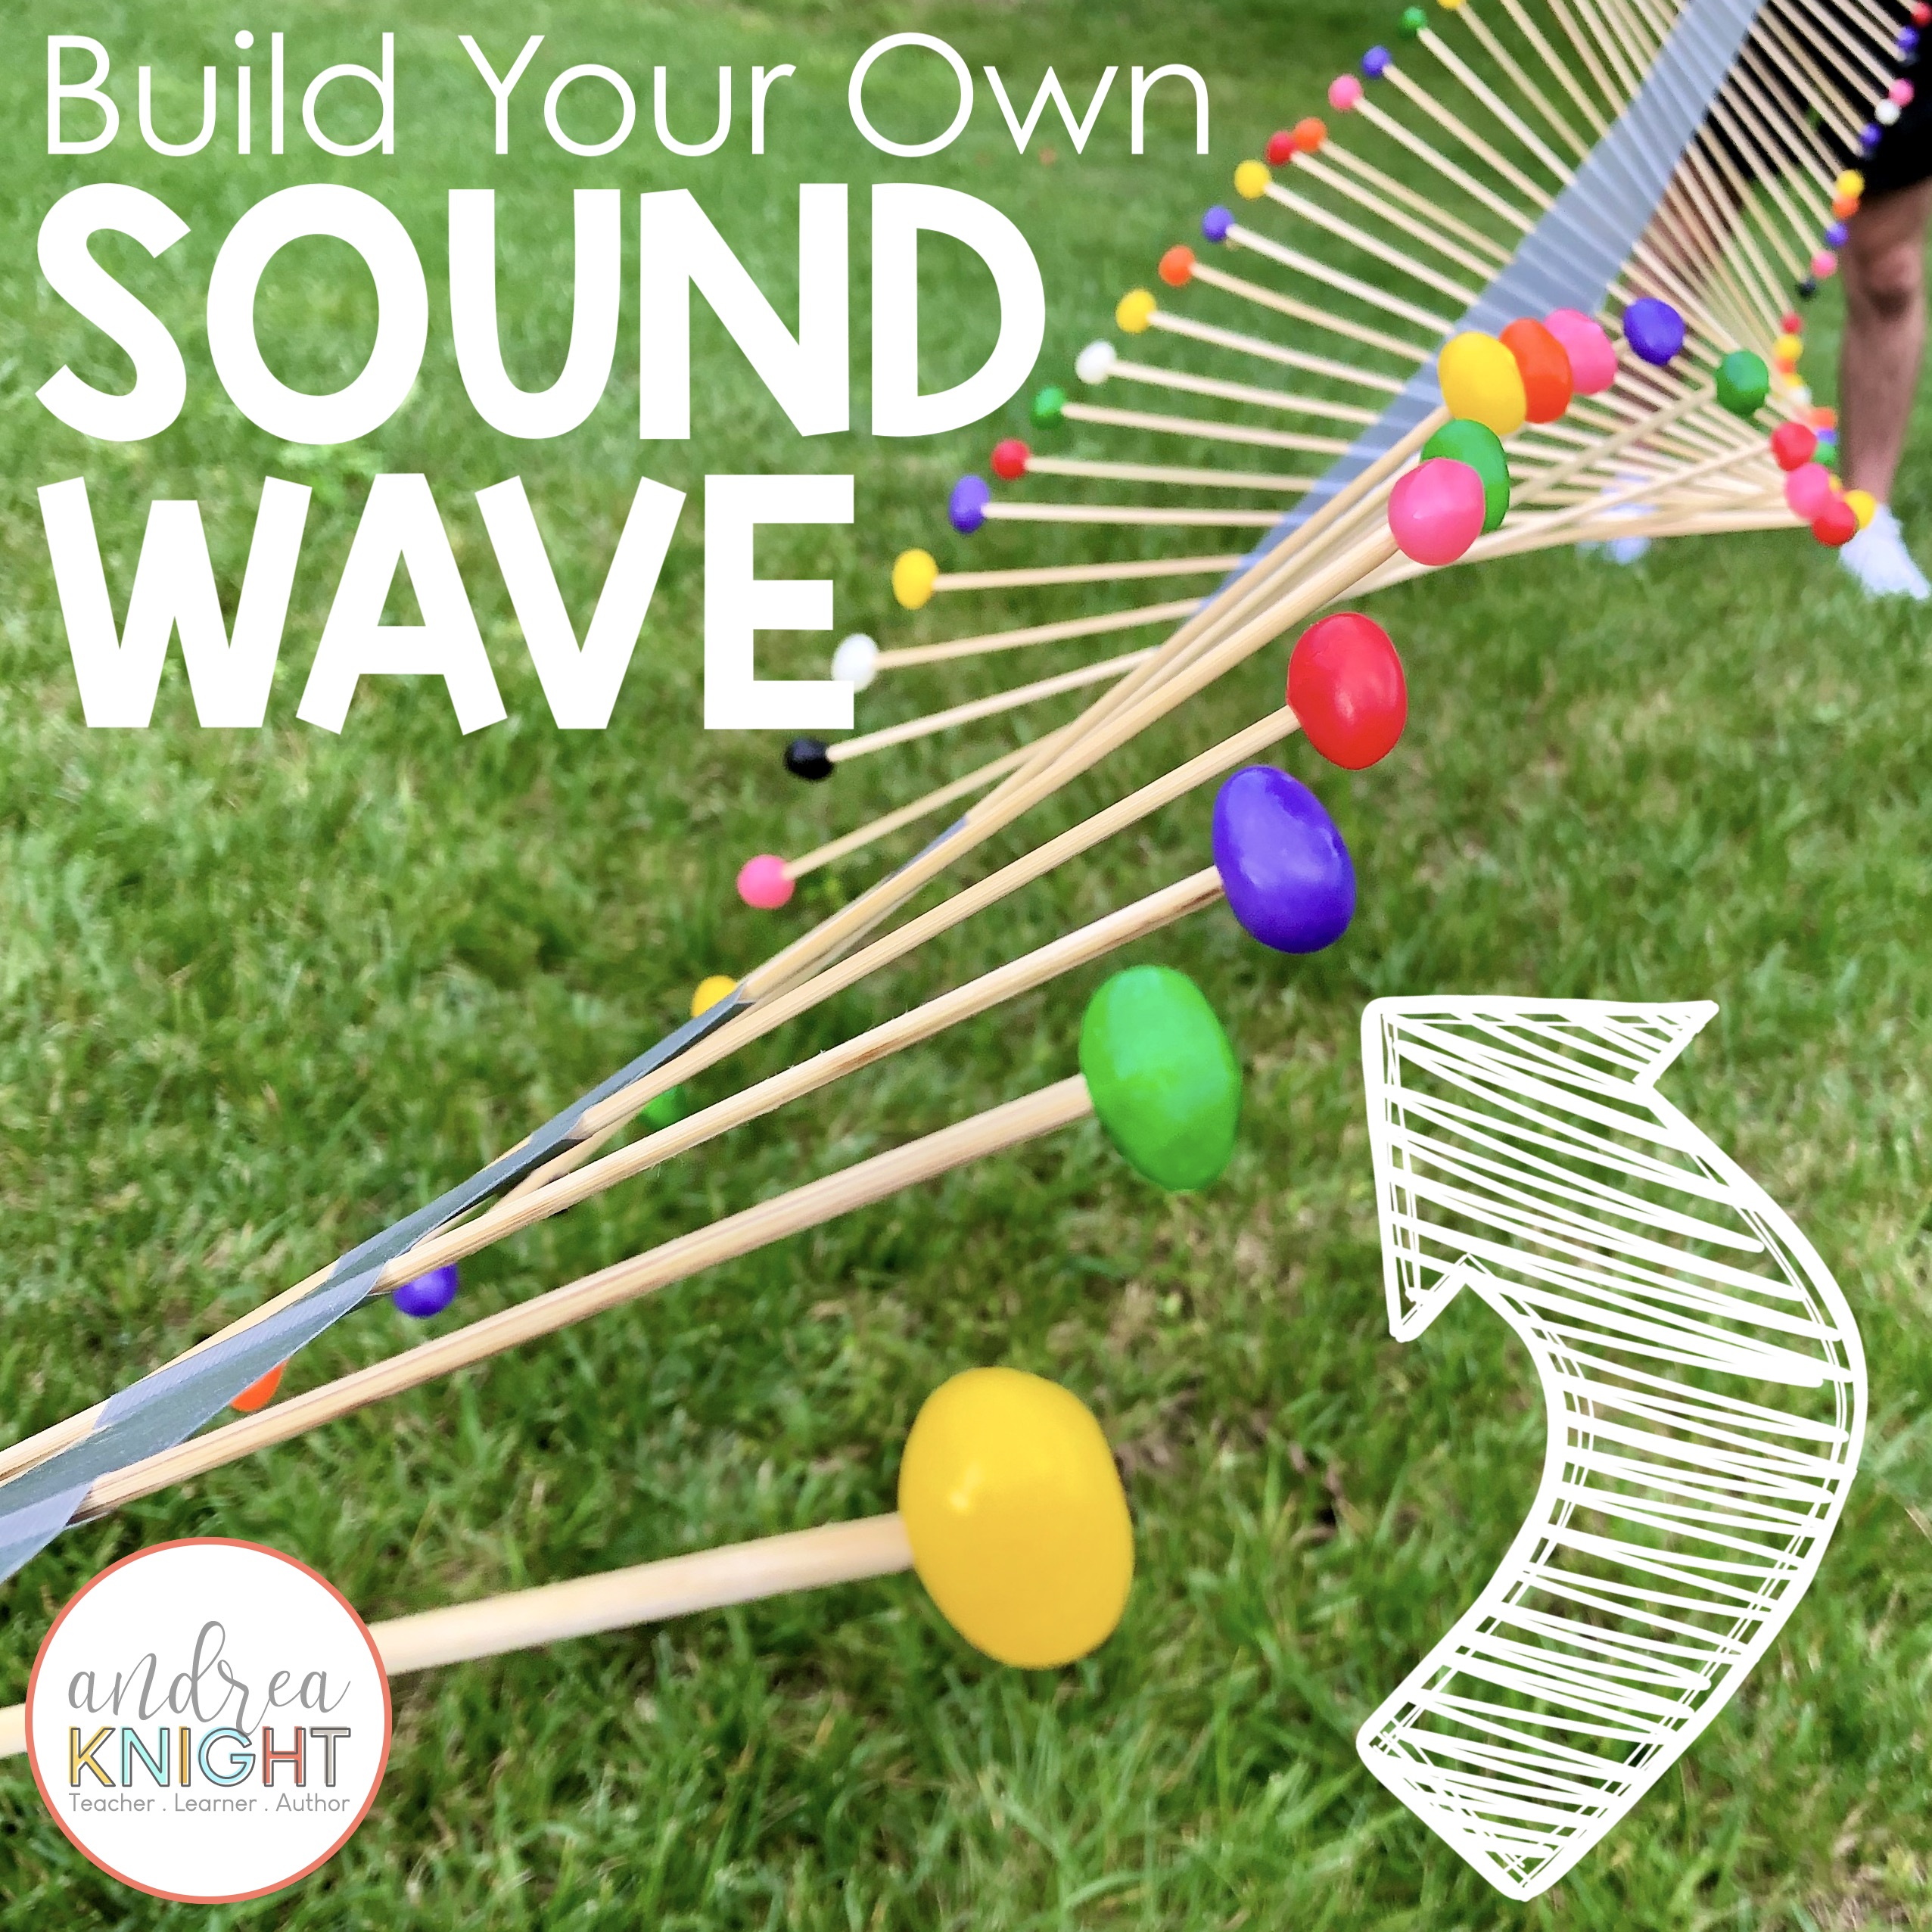
Making a sound wave model takes some time, but the wow factor can’t be denied! You only need three things to make your model: duct tape, wooden skewers, and clay. NOTE: To save time, we built ours using jellybeans, but I think the weight of the clay would provide an even better result. If you use clay, roll each ball to roughly the size of a large grape.
Nonfiction Science Text
I have a hard time finding science material my first-graders can actually read, so it has become my habit to just write our own. It’s a win-win really because then I have a paper copy for each of them. By having their own, we can not only read it together, but the kids can practice it independently and even take it home to share with their families. The books serve double-duty during reading and phonics instruction, too. We can highlight key vocabulary words, find and circle word wall words, and even personalize the interactive pages.
This science book, What Is Sound? , introduces children to the concept of sound and how it behaves. Key science vocabulary such as pitch , volume , vibrate , and echo are emphasized in the text.

Key Vocabulary Posters
There are some pretty BIG words for some pretty young kids in this science unit, so I created a set of posters to help the children understand and remember them. Each poster features the key science term, a colorful graphic, and a kid-friendly definition. The set includes 8 different posters for the following vocabulary words:
- communicate

Key Word Game Cards
Mini-versions of the key word posters have been included in the resource. Originally, I just intended to use them as cards in a “Memory” style game, but they’re also good for student-pairing activities and vocabulary review. There are nine pairs of words in the set: sound, waves, vibrate, volume, pitch, echo, ear, communicate, and loud .

Student Worksheets
I also included some additional worksheets to help support science instruction and provide a connection to other subject areas, such as writing and phonics.
You can preview more of this first grade science unit👉 HERE . It includes printable materials for teaching children the science behind light and sound, as well as how we use both to communicate with others.
Science Ideas on Pinterest
Even though I teased about a Pinterest-Fail at the beginning of this post, I do love Pinterest. (I have discovered though, if it looks too good to be true, it probably is.😂) If you’re planning a science unit on the study of light and sound, click over to my Pinterest board: Light and Sound Science . I’ve added pins that lead to great ideas for supporting your instruction. You’ll find science videos, book suggestions, integrated projects, and more.

Recommended Book List
Check your school or local library for titles to support your science instruction. These are some of the books I’ve used for read-alouds and to help build my own background knowledge as I planned the unit.
- Sounds All Around by Wendy Pfeffer
- How Sound Moves by Sharon Coan
- How Does Sound Change? by Robin Johnson
- Oscar and the Bat by Geoff Waring
- The Listening Walk by Paul Showers
- Sending Messages with Light and Sound by Jennifer Boothroyd
CLICK👇TO PREVIEW THE RESOURCE

LIGHT AND SOUND SCIENCE UNIT
Happy teaching!
MORE SCIENCE POSTS FOR 1ST GRADE

In the Loop

Top 10 Sound Experiments: Fun & Easy
Sound, an intrinsic part of our lives, is more than just a medium for communication and entertainment. It is a fascinating scientific concept, offering insights into how energy travels and interacts with our environment.
This carefully curated selection is designed for learners of all ages, covering fascinating topics like vibration, sound waves, pitch, and resonance. These hands-on, educational experiments will not only amplify your understanding of the science of sound but also strike a chord with your innate curiosity.
We hope you enjoy this compilation of sound experiments and that it inspires you to continue exploring the wonders of science.
1. How to See Sound Experiment
The How to See Sound experiment is a fascinating way to explore the relationship between sound waves and visual patterns.
The How to See Sound experiment is a fun and insightful experience that is likely to pique your interest, whether you’re a scientific enthusiast, an artist, or just someone who enjoys discovering the wonders of the world around you.
2. Glass Bottle Xylophone
Seeking an innovative and entertaining technique to learn more about the science of sound? With the help of the Glass Bottle Xylophone experiment, students can build their own musical instrument and learn about the fundamentals of sound.
3. Singing Spoons
Do you want to learn more about the science of sound in a playful and imaginative way? Using just a few spoons, the Singing Spoons experiment is a fascinating and fun project that you should try.
4. Make a Straw Oboe
Make your own musical instrument by cutting a straw to a specific length and blowing across the top to create different notes. Experiment with different straw lengths to produce different pitches.
5. Create a Thunder Drum!
Creating a thunder drum is a unique and exciting way to explore the properties of sound and can help students understand these concepts in a more tangible way.
6. Musical Wine Glasses
The musical wine glass experiment is a fun and easy way to explore the science of sound and create your own musical instrument. By filling wine glasses with different amounts of water and tapping them with a spoon, you can produce a range of musical notes and create your own melodies.
7. Tuning Fork Resonance Experiment
The tuning fork experiment is an established representation of how resonance and frequency work in the study of sound.
Students can see and measure the effects of resonance and frequency in this experiment by experimenting with various objects and tuning forks of different frequencies.
A hands-on introduction to the fundamental concepts of sound and waves is provided by this simple yet interesting experiment.
8. The Doppler Effect with Sound
Through the use of sound waves generated by a moving sound source, students can investigate the Doppler effect in this experiment.
Students can learn about the Doppler effect and its use in disciplines like astronomy and radar technology through this exercise in an useful and fascinating way.
9. Soundproofing Experiment
Students can learn about the science of soundproofing and its importance in building pleasant and effective surroundings through this project, which is a practical and hands-on learning experience.
10. Standing Waves
With the help of this experiment, students can learn about the fundamentals of wave interference and resonance as well as how these ideas are used in real-world situations.
Similar Posts:
- 68 Best Chemistry Experiments: Learn About Chemical Reactions
- Top 100 Fine Motor Skills Activities for Toddlers and Preschoolers
- Top 58 Creative Art Activities for Kids and Preschoolers
Leave a Comment Cancel reply
Save my name and email in this browser for the next time I comment.

COMMENTS
Listen to the sound it makes. Pull the string back farther and pluck it again. The sound should have been louder. Ask your student why the second sound was louder. Pulling the string or rubber band back farther created a larger vibration, thus a louder sound. The volume increased. To make a softer sound, don’t pull the string or rubber band ...
Jan 31, 2017 · Teaching children about sound and volume is a hard task. This simple Sound And Volume Vibrations Science Experiment for kids is a great homeschool lesson that will help you accomplish this task easily with all ages. Your kids will also be able to enjoy different types of music in the process! Sound And Volume Vibrations Science Experiment
Nov 19, 2018 · Learning about sound is endlessly fascinating, but can be tricky for little learners to grasp. Encourage your child to explore the exciting science of sound using simple and practical hands-on activities. This article shares 7 cool sound science experiments your child will love!
Apr 26, 2021 · In the Sound and Vibrations 2: Make Sprinkles Dance lesson, students learn that sound can create vibrations (rather than vibrations creating sound, as demonstrated in the rubber band guitar lesson). Using a simple setup with a plastic-covered dish (a model membrane) and candy sprinkles on top, students will create sound waves by humming and ...
Some students even noticed the slinky bounce back after reaching the student holding the other end of the slinky. This was a great chance to discuss echoes and how sound bounces. Fork a Sound Experiments. This is perhaps my favorite sound experiment for kids! I love the excitement that it causes and the ‘explosive’ result.
In this activity, students experiment with tuning forks to produce various pitches and volumes. Tuning forks allow us to study the basic qualities of sound first hand. A tuning fork emits a pure musical tone (after waiting a moment) as it vibrates after you strike it. There are 2 basic qualities of sound: Pitch (high & low) Volume (loud & soft)
Children investigate the pitch and volume of the sound made when 5 different balls are dropped. Recognising the difficulty of measuring pitch and volume without equipment, children make 5 measurements and then choose the modal value. Children transfer their results to a scatter graph showing both pitch and volume.
Singing Spoons is a fun way to show kids how volume and pitch change depending on whether sound waves are traveling through the air or through a solid, similar to the way a stethoscope works. It’s one of our favorite sound experiments and is pretty easy to set up. Just use tape to connect three metal spoons to a piece of string or yarn.
Aug 26, 2024 · Students can see and measure the effects of resonance and frequency in this experiment by experimenting with various objects and tuning forks of different frequencies. A hands-on introduction to the fundamental concepts of sound and waves is provided by this simple yet interesting experiment. 8. The Doppler Effect with Sound
Repeat the experiment, slowly increasing the volume for this new tone. How is the new tone different, does it sound higher or lower? How does the new tone affect the ...